
![]() 👉 Do It Yourself from the Field of Master Mind Health (MMH) 🌿
👉 Do It Yourself from the Field of Master Mind Health (MMH) 🌿
Shared from the research of: Joseph Mercado 👨
Article Author: Crissy Joshua 👩
Content Contributor: Nicole Apelian – The Lost Herbs 
To: Health Lover 🌱
Blog Post #1087 📌
Re: Making Your Own Probiotics 🍵
Date and Time: Saturday, November 21, 2020 at 3:05 p.m. ⏰
Dear Health Lover,
Probiotics are a type of good bacteria that are only found in a handful of foods.
They are known for their ability to improve and maintain a healthy gut.
However, the health benefits and medicinal properties are numerous and will do more than just keep your microbiome healthy.
The most common foods that contain probiotics are:
- How To Make Your Own ProbioticsPickles
- Sauerkraut
- Yogurt
- Beetroot
- Kimchi
- Miso
- Fermented drinks (e.g. Tepache, Kombucha, Kvass)
While you can purchase most of these in your local supermarket, it’s both fun and rewarding to make your own probiotics at home.
Making your own also allows you to adjust the recipe to your liking, according to your taste.
Probiotic drinks are a good place to start if you’re new to this.
Many of them use fruit as their yeast source, meaning you don’t need to purchase hard-to-find ingredients.
How To Make Medicinal Tepache At Home:
I’m going to show you just how easy it is to make Tepache at home. Tepache is a Mexican drink and is pronounced ‘te-par-chey’.
This incredible drink is not only full of probiotics but also prebiotics and antioxidants.
The added cinnamon and ginger are also anti-inflammatory, making this drink particularly beneficial for your health.
Medicinal Benefits of Tepache:
- Can help with inflammatory bowel diseases, e.g. Crohn’s Disease
- Can help relieve Irritable Bowel Syndrome symptoms
- It’s hydrating, which helps keep your joints lubricated, your organs in good condition and boosts cognition
- Contains a lot of Bromelain, an enzyme that fights cancer cells
- It’s rich in vitamins and minerals, including Manganese, and Vitamins B & C
- It’s a natural diuretic, which helps rid your body of sodium, in turn reducing blood pressure
There are a whole host of other medical conditions, which many claim probiotics can help, including asthma, eczema, urinary tract infections, and rheumatoid arthritis.
However, there haven’t been large enough studies undertaken as yet to verify the positive links between probiotics and these medical conditions.
Nevertheless, probiotics are an important part of our diet and new benefits keep appearing all the time.
Probiotics are generally recommended for the majority of the population, with a few exceptions: people with a compromised immune system or those who are critically ill.
Recipe:
This Tepache recipe is surprisingly easy to make and tastes great.
It’s also quick in comparison to most probiotic drink recipes.
It’s a great recipe to start with if you’re new to making probiotics at home.
Ingredients:
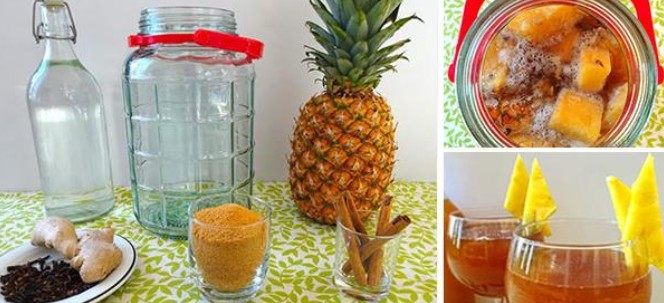
- 1 ripe pineapple
- 1 cup of unrefined cane sugar
- 2 quarts / 8 cups of water
- 5 inches / 4cm of ginger
- 2 cinnamon sticks
- 3 cloves
How To Make Your Own Probiotics – Ingredients:
Note: You can make Tepache using just the first three ingredients on the list. Hence, if you are not a fan of ginger, cloves, or cinnamon, leave them out. Conversely, if you love any of these, feel free to add more in.
Equipment:
You’ll need the following essential equipment to make this Tepache recipe:
Large glass container – the jar that I used can hold 1 gallon / 4 liters. If you have a smaller container, just halve the recipe. If you continue making probiotic drinks, you’ll probably want to invest in a larger container at some stage because of the long fermentation time. That way you can make big batches and keep the finished product in the fridge. It’s important you use glass because other materials can interfere with the fermentation process.
Serving bottles – these are really useful if you plan on continuing to make your own probiotic drinks. You can also use any glass jars you have lying around or water jugs. Just remember to seal any finished probiotic drink before storing it in the fridge.
Sharp knife – for cutting the pineapple peel away and ginger skin.
Tea towel or cheesecloth – for covering the glass container while the Tepache cultures.
Grater – for grating the ginger. Optional equipment, when it comes time to strain your Tepache mixture:
Fine sieve – a fine mesh strainer is perfect. You can also use cheesecloth.
Large salad/serving bowl – a handy tool for pouring your mixture into before transferring it to your serving bottles.
Funnel – this is to pour the finished Tepache into narrow-necked serving bottles. If you use a water jug or carafe you can skip this.
Ladle – can be useful for transferring the mixture slowly into your serving bottle via the funnel.
Instructions:
1. Prepare your pineapple – using a sharp knife, cut off both ends of your pineapple and discard these. Rinse the body of the pineapple under running water for one minute, while rubbing the peel with your hands. Cut the peel off and then cut it into smaller squares. Cut the core away from the flesh too and chop it into cubes. Set this aside, it will be the basis for your Tepache.
Note: You only need to use the peel. If you want a stronger flavor or don’t think you can eat all the flesh before it spoils, you can also cut this into cubes and include it. Traditionally, Tepache was made using just the peel and the health benefits will still be the same.
2. Ginger & spices – grate 1.5 inches (4cm) of ginger (you should have a heaped tablespoon once done). You don’t need to mince it; use the largest holes on your grater. Get out two cinnamon sticks and three cloves and place these with the ginger.
How To Make Your Own Probiotics – Step 2.1How To Make Your Own Probiotics – Step 2.2
3. Add the first ingredients – add the ginger, cinnamon, and cloves to your glass jar first, so the pineapple helps weigh them down once you add the water. Next, add the pineapple chunks. Your jar will start to get heavy after this step so it’s a good idea to add your ingredients to the jar in the location where you want to store it. It will need to be kept at room temperature and somewhere away from direct sunlight.
4. Sugar – add 1 cup of unrefined cane sugar (you may know it as Panela, Piloncillo, Panocha, or Rapadura). If you can’t get hold of unrefined cane sugar, you can use brown sugar, or white sugar at a pinch.
5. Water – add 2 quarts (8 cups) of water.
6. Cover – cover the glass container with a tea towel folded over twice or with cheesecloth. You can also use plastic wrap that is very loosely draped over. If you live in an area with lots of bugs and flying insects, it’s best to use a tea towel or cheesecloth and place an elastic band over the lid to seal it close.
7. Ferment – let it sit for 1-3 days, depending on your flavor preference (one day will produce the mildest strength and three the strongest). You should see a light layer of white froth at the top of the jar somewhere between 24 and 36 hours into the process. You can scoop this out with a wooden spoon, or mix it back into the mixture. It’s not harmful.
The longer you let it sit and culture, the more sour, fizzy, and alcoholic it will become. However, it will still have a low alcohol content if you don’t let it ferment for more than three days. I recommend you test your mixture after 24 hours and then every 12 hours. If you live in a hot climate, the process will be even faster so check it regularly.
8. Strain – When you’re ready to strain your Tepache, use whatever method you prefer. I find that it’s easiest to strain it through a sieve into a large salad or mixing bowl. Then, I take a ladle and pour it through a funnel into my servings bottles. Like I mentioned earlier, if you are going to use a water jug with a big opening, you can skip the funnel step and pour or scoop it straight in.
You can drink some straight away but it’s best chilled, so pour it over ice. Otherwise, place a lid on it and store it in the fridge to enjoy it in your own time.
Tip: You can use the pineapple peel again because it will still have enough yeast for another batch.
Content Source: TheLostHerbs.com
👀 View the Photos Here 👇
 Email Us a Message
![]()
 Have a question about this article
Please send us an email message below and we will serve you momentarily. 
 Fly Over to the MMU Facebook Page with Hoot

 Join the MMA Facebook Group Today
![]()