
![]()
Constructive Preparation from the Field of Master Mind Survival (MMSUR)
Shared from the nature of: Joseph Mercado
Article Author: David Dawson – Survival Mastery
To: Survivalist
Blog Post #727
Re: How To Build An Underground Cellar
Date and Time: Monday, June 10, 2019 at 1:16 a.m.

Dear Survivalist,
Underground cellars are the old-fashioned way for people to store food, without it going bad for months. They retain the right relative humidity and keep it cool, so that the food can be preserved for longer periods of time.
Not only that, but the cellar is usually always in darkness, which also contributes to the food preservation. After all, people in the past didn’t own refrigerators so everyone had a cellar in their backyard.
Historically, root (underground) cellars date as far back as 40000 years when people discovered that if they bury their food underground, it would remain fresh and edible for a long period of time.
And yet, to be able to build your own underground root cellar, you need to know some basic and very important details. We will share and explain them in this article.
Basics before you start building
The idea behind root cellars is that, keeping the food fresh, means keeping it alive and prolonging its life. To achieve that, carbohydrates packed in the produce should have proper contact with oxygen, thus creating heat. So, to keep this process recurring, we need to look at three main factors contributing to this process – humidity, temperature and ventilation.
Temperature varies depending on what produce you intend to store. Food, which can tolerate lower temperature, like autumn crops or roots, can be kept at 30 to 33 degrees F.
When it comes to softer and warmth-loving vegetables like tomatoes, they should be stored at about 50 degrees F. So, as you can see, it’s best if you can monitor the temperature, and if possible regulate it.
When it comes to humidity, usually about 90% is ideal for most products. This is especially true for all types of root vegetables, like carrots, potatoes, etc. Leafy vegetables also benefit from highly moist environments. Onions and garlic, on the other hand, should be stored at a slightly lower humidity level, at about 60%. In case you need to increase this percentage, you can keep the floor wet or place some buckets of water.
Finally, let’s look at ventilation. This is important since ventilation will remove excess heat (which is produced by the food, as we explained earlier) – by ‘breathing’, the food produces heat and carbon dioxide.
Also, ventilation removes certain chemical compounds, naturally produces by some (or all) foods, and these may affect the neighboring produce and cause sprouting.
Such a compound is ethylene. So, to make sure ventilation is taken care of, you should plan air pipes (or other ways for ventilation) before you actually start building the underground cellar.
If all these conditions are met, you can easily create your very own food storage for dark times. If you’re not sure how this works, take a look at our article on emergency food storage – we have plenty of ideas!
How to build the root cellar
Here come the building instructions and advice. You have a few options before you actually start building and digging. If you have an underground basement, part of your house, and any additional heat sources are turned off, then you can use it for the cellar.
Of course, think before committing to this decision and consider whether it will be possible to add ventilation pipes. If not, then probably it’s best to start digging outside your house.
In any case, underground cellars are usually located outside the house and its perimeters. You can build a cellar fully underground and build a vertical tunnel, to which you can attach a staircase so you can enter the room, or you can use an existing hill nearby your house, which can be entered from ground level.
The hill itself will act as the cellar. Either of these is ok, and depends on whether you have access to a hill or not. You should also be aware that it’s best if the cellar faces north. This will keep the cellar cool even during warm summer days.
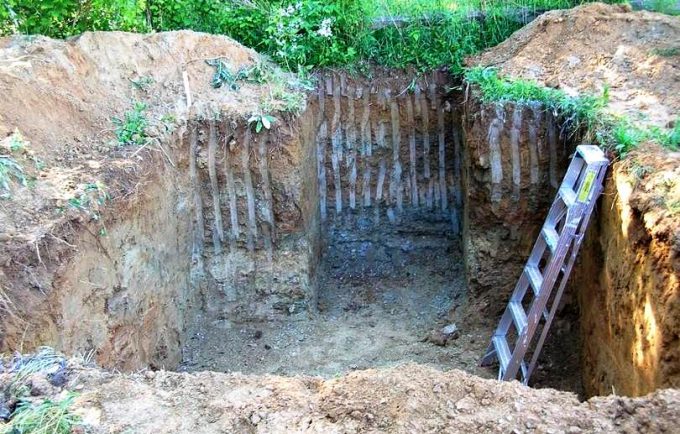
Whichever of these two you choose, it’s time to start digging. Decide how large the root cellar should be, how much you plan to store (especially during the winter season) and make an appropriately sized underground cellar. When you finally decided how large it should be, it’s better to dig a bit more to the sides so you have enough room to continue with the building process.
Now that the hole is ready, you have to assemble your building material. It’s best if you build the walls and roof of the cellar with some concrete material.
Wood can also be used, but since it’s an organic material it will not last as long in highly humid conditions. Wood can rot pretty quickly and may crumble, destroying your food products.
So, ideally commit to concrete walls and start building and strengthening the hole. It’s best to leave the floor uncovered and keep the soil exposed. Since soil retains coolness and moisture it will contribute to the needed conditions in the underground cellar.
Since soil isn’t going to be covered, rodents and other earth creatures may be able to creep into the cellar and eat your produce. To avoid that, you can use a metal wire-frame and cover the soil with it. After all, you should expect some insects and vermin.
If the prospect of these doesn’t appeal to you, you can of course cover the floor with concrete, but you’ll have to use some other methods of keeping the high humidity in the cellar. Keep buckets of water or wet soil/sand on the floor, close to the products, and water them every time you see the moisture level is down.
Support the roof with stone pillars to keep it from crumbling. The roof should be several feet under the ground level, so you can have the necessary conditions met.
So far so good. Next, you need to think of adapting a ventilation system to your underground cellar. Remember that cold and cool air drops down to the ground and warm and hot air rises above.
So, to be able to keep cool air within the cellar, you should have one ventilation pipe that goes all the way down to the cellar floor, and exists above the cellar. To vent the warm air, you need to have another pipe that enters the cellar from above, but only a few inches and exists above ground, just like the first pipe.
Thus, warm air within the cellar will be able to escape through the second vent. The best positioning for both intake and exhaust pipes is that they are located in two opposite corners of the room. This way, the air must move in a circle from one corner to the other. Also, the ventilation process will be smoother this way.
To prevent insects from coming in the cellar through the vents’ openings, you can place a metal wire frame or metal net over them.
You should also consider a good and reliable door to your cellar. It shouldn’t be wooden since it can rot or be damaged much easier, so best have a metal door. Of course, a wooden door may also be an option (to a limited extent), since the other ‘face’ of the door is exposed to the outside environment, and some moisture can escape.
In any case, this is best for both types of underground cellars – fully underground or built in a hill. For the first type (fully underground) the cellar’s door will be attached to the roof and you will enter it from above.
For the second type (built in a hill), the door can be placed at horizontal level so it’s much more accessible and easy to enter. You may also want to build a third variation (combination of these two) – fully underground, but you can build a winding stone staircase leading to the cellar. The entrance and door is at the ground level. This makes it easier to access and transport food in and from it.
Designing your cellar’s interior & storage advice
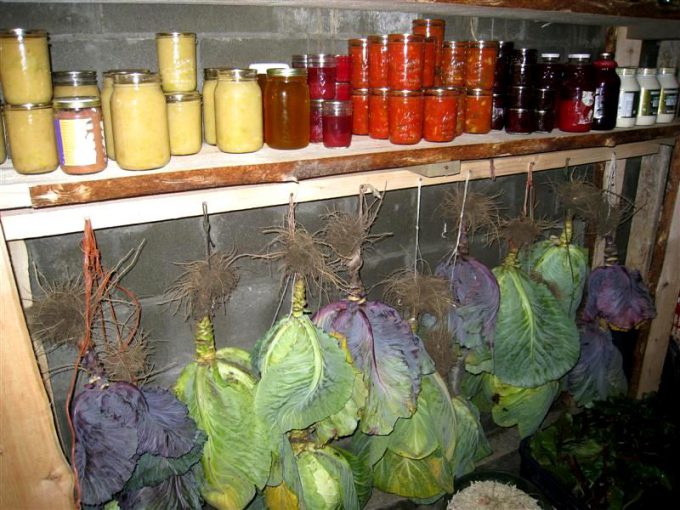
Now that you’ve almost built the cellar, you may have to proceed to making the shelves. Ideally, they should be wooden and not metal. This is because metal can easily transmit and accumulate heat; whereas wood will help you better control the cool conditions in the cellar.
Due to the high level of humidity the wooden shelves may deteriorate with time, but this is a small change to make now and then. Of course, you can substitute the wooden shelves with metal ones, but you’ll have to be more conscious about keeping the conditions in control.
Apart from shelves, you will also have to think of where to store the food – containers, boxes, etc. Ideally the food should be open to the environment and not kept closed in containers. So, wherever your place them, they should be able to breathe and be ‘alive’ in the root cellar.
You can definitely use cardboard boxes for example, as long as you don’t close them. Due to the possibility of vermin or bugs, you may have to keep the produce in metal wire meshes with small holes, yet large enough to let the vegetables and fruits breathe easily.
Also, to be able to store your products at best conditions and prolong their life as much as you can, you shouldn’t wash or rinse them before storage. Keep them as natural as possible; you can also mimic nature, by placing the products in wooden shavings, sawdust, newspaper (wooden material) and other such organic material. Don’t cover the products entirely, but place it on a bed (like a nest) of these materials.
Another thing to keep in mind is to always check on your food and its condition. You should know that a root cellar may prolong the product’s life, but the food has a limited life cycle. With time food will deteriorate and may rot. You should be always aware of fruits or vegetables that have already ripened. These are the first to go bad.
Always try to consume first the products that are already ripe. If you identify a bad product, remove it immediately or it may compromise the health of the neighboring products (or even the entire box!).
Whenever you take a product out of the underground cellar, consume it as soon as you can. Once away from the cellar’s conditions it will go bad really quickly. If you don’t really know the type of food you can store in a root cellar, take a look at our article on best prepper food.
As we already mentioned ethylene earlier, we need to explain a bit more the details around it and why you should be aware of it. Ethylene is a gas (chemical compound) emitted by the ripening fruits (and some vegetables).
If the cellar is small, this gas may accumulate quicker than it can escape through the vents. You should know that apples are one of the main culprits of ethylene emission. If you plan on storing apples along with all your other products, you should be particularly cautious of this gas.
If too much of it is produced it will quicken the ripening of all other products. Root vegetables like potatoes and carrots will harden and become bitter at taste. They will soon be inedible if exposed to too much ethylene.
So your options are the following:
- You can have a separate underground cellar just for fruits, to keep them away from the vegetables.
- You can also simply not store apples, but this is too limiting.
- The third option is, if you want to build only one large root cellar, simply keep the apples far above, near the roof, close to the ventilation pipes, so that the ethylene can’t build up and thus can escape faster. Of course it depends on how much apple products you plan on storing. If you tend to have a lot of fruits throughout the summer, it’s much better to have a separate cellar for fruits. If your apple production is small anyway, simply keep them on a higher shelf, close to a ventilation opening.
If you want to store different types of products in the same cellar, remember that products that thrive best at low temperatures should be positioned low in the cellar (ideally on the ground level).
On the other hand, products that need slightly higher temperatures to stay fresh should be kept on higher shelves (mostly fruits). This ensures that the ethylene from fruits will be able to escape easier through the ventilation pipes.
A word of caution – don’t keep any canned food in the cellar. Keep only fresh products and nothing else. Due to the high percentage of humidity, cans can rust and compromise the seal. This is also true about metal lids or jars. For vacuumed canned food and jars, a dry cool place will be ideal. Keep them away from the humid root cellar.
You should also attach humidity gadgets (hydrometer) and a thermometer on the door, so you can monitor these values on a regular basis. During the winter, these conditions will be easily met, while during the summer, it may get hotter inside. Of course, your primary concern is to keep your summer products during the winter season, so this is of relatively low concern.
You can also have some electricity running in the cellar, so you can have light when you need to take something in or out. The light bulb should be well insulated, since high humidity may cause electric shocks if any cables are badly insulated.
Besides, a bit of warmth coming from the light, during winter, can be beneficial if temperatures outside are too low and may affect the underground cellar’s temperatures. Light from bulbs can raise the temperatures with several degrees, reaching the optimal average of about 40 to 50 degrees F.
Final advice and tips for keeping the food alive
Here are some final important notes and advice on building your root cellar. Don’t build the cellar near a tree. Tree’s roots can spread more and more with time and they may compromise the stability and walls of your cellar. Stay away from trees.
Another thing to consider is digging a drain hole in the center of the cellar or at the floor corners. If your ground floor is the soil itself some water may build up as a result of heavy rainfalls or long rain periods.
To be sure that the water can drain it’s best to dig a few holes, add pipes to them and surround them with some sawdust or wooden shavings. Screen them with metal wire meshes to block the pipes, so no rodents and vermin can enter the cellar.
You can also position garbage cans near the center of the cellar so that water can drain in them, but remains for some time. The idea is that it won’t accumulate throughout the entire cellar. Again, keep some organic (wooden preferably) material around the cans’ opening to blend it nicely with the cellar.
Article Source: Survival-Mastery.com
![]()
Have a question about this article?
Please send us an email message below and we will serve you with an answer momentarily.

![]()